Set Up Your Call Settings
What’s a Rich Text element?
The rich text element allows you to create and format headings, paragraphs, blockquotes, images, and video all in one place instead of having to add and format them individually. Just double-click and easily create content.
Static and dynamic content editing
A rich text element can be used with static or dynamic content. For static content, just drop it into any page and begin editing. For dynamic content, add a rich text field to any collection and then connect a rich text element to that field in the settings panel. Voila!
How to customize formatting for each rich text
Headings, paragraphs, blockquotes, figures, images, and figure captions can all be styled after a class is added to the rich text element using the "When inside of" nested selector system.
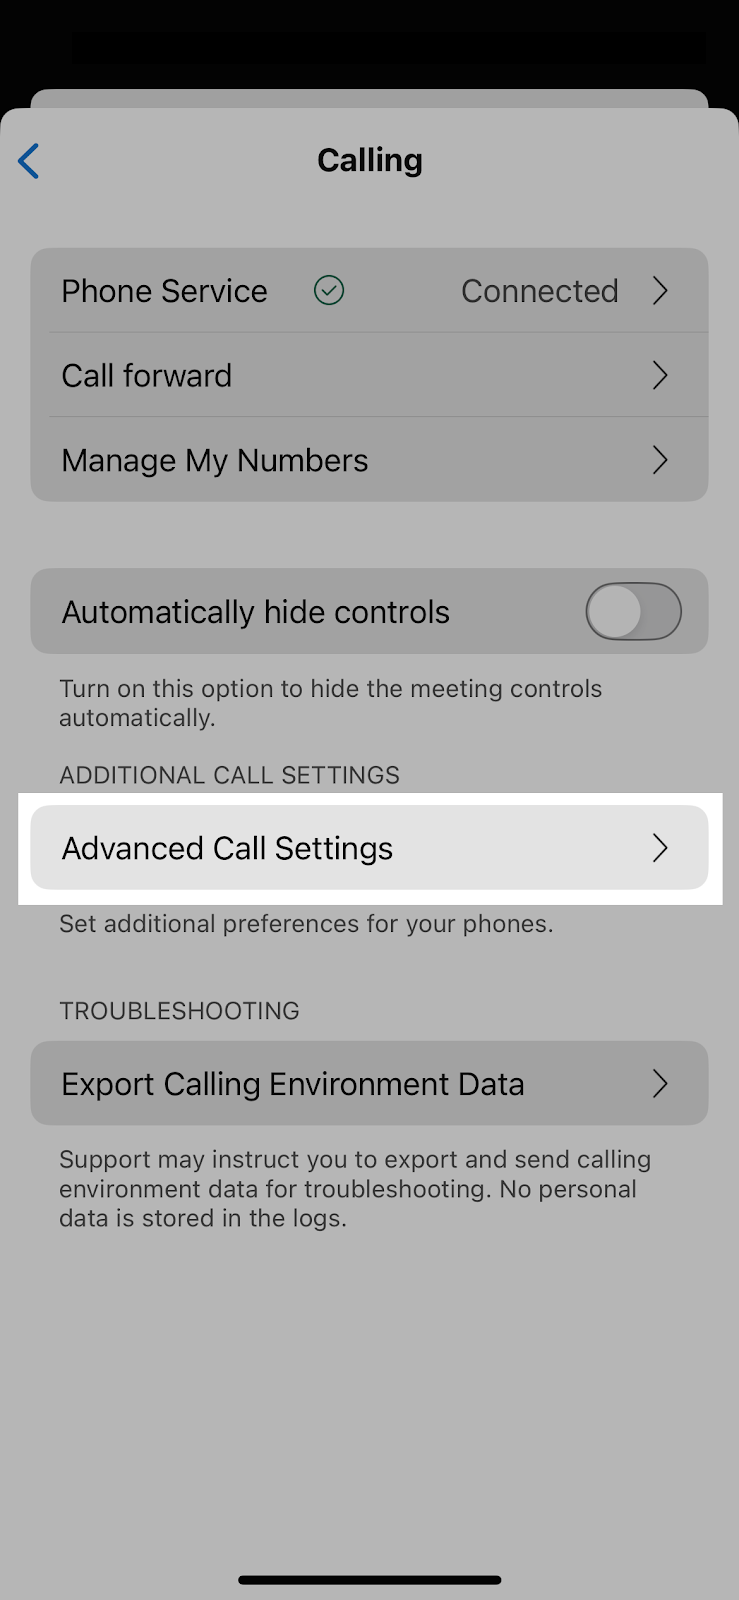
Access Advanced Call Settings
Advanced call settings allow you to set additional preferences for your phone system.
- 1. In the app header, tap your profile picture.
- 2. Tap Settings.
- 3. Tap Calling.
- 4. Select Advanced Call Settings.
Incoming Calls
Incoming call options provide a quick way to set your incoming call preferences, normally configured via the portal, directly from the desktop client. If you are running the softphone app on multiple devices, the settings you manage here are applied to all devices.
Do Not Disturb
Do not disturb sends all incoming calls to voicemail and does not ring on your devices. To enable, tap the Do Not Disturb toggle.
Note: Enabling this feature can affect other group call routing features that you may be a part of like a call center or call queue; however, we recommend that if you are a part of these, you manage your Do Not Disturb and available status within those environments.

Anonymous Call Rejection
Anonymous Call Rejection allows you to reject calls that have a blocked caller ID attached. When activated, all anonymous calls are instantly rejected, preventing the caller from even leaving a message. The default setting for this feature is off. To enable, expand Incoming Calls and select the toggle next to Anonymous Call Rejection.

Call Forwarding
Call Forwarding allows you to forward calls to the desired number instead of your voicemail. Call forwarding options include: always, when no answer, when busy, and when not reachable. If you have not enabled a call forward service, then calls automatically forward to voicemail.
To start, expand and select one of the following options:
- Always - Forwards all incoming calls to the specified destination and has the highest service precedence. It overrides all other forwarding and mobility settings. Toggle on to enable and enter the number to forward calls to.
- When Busy - Forwards incoming calls only when you have call waiting disabled and are currently on another call or have Do Not Disturb on. Toggle on to enable and enter the number to forward calls to.
- When No Answer - Forwards incoming calls only when you are away or not answering calls. Toggle on to enable and enter the number to forward calls. Use the drop-down menu to designate the number of rings before the call is forwarded.
- When Not Reachable - Automatically forwards all incoming calls to a different phone number, but only when all of your devices are offline and not connected to the network. Toggle on to enable and enter the number to forward calls to.
Simultaneous Ring
Simultaneous ring allows you to add phone numbers of other devices that you would like to ring at the same time as your primary phone, when you receive a call. You can have up to 10 simultaneous ring numbers at one time.
To enable, expand Simultaneous Ring, and select the toggle next to Ring Numbers. Enter a number in the Set number field and press Done on your keyboard. If you'd like for simultaneous ring to only occur when you're not on a call, select the toggle next to Do Not Ring When On a Call.
Sequential Ring
Sequential Ring allows you to ring up to five locations (including the base location) one after the other for incoming calls that match a predefined set of criteria.
To enable, expand Sequential Ring, and then configure the following settings.
- To ring the base location first, select the toggle next to Ring Base Location First. Choose your number of rings from the drop-down menu. Select the checkbox next to Continue if busy, if applicable.
- To allow a caller to cancel being sent through to additional phone numbers, select the toggle next to Caller May Cancel.
- Expand Ring Numbers to enter the phone numbers you would like to ring. Enter the phone numbers in the Set number field and press Enter on your keyboard after each one to save. For each phone number, you can choose to require an answer confirmation by checking the box next to Answer confirmation required. You can also choose the number of rings before it moves to the next phone number from the drop-down menu.
- Enter the criteria for when this setting is enabled by expanding the When to Ring area.
Remote Office
Remote office allows you to use your home phone, mobile phone, or other device as your business phone. Calls made from this remote phone using click to dial, are billed to your business, and all calls that come to your business phone ring the remote office phone. To enable Remote Office, select the toggle. Then, enter the phone number you wish to use as your remote office phone in the textbox.
Call Waiting
Call waiting provides multiple instances of the same line so while you are on the phone, it will still ring for the next incoming caller, and you can put the first caller on hold to answer it. It gives you the advantages of having multiple lines but on a single line phone. To enable, expand Incoming Calls and select the toggle next to Call Waiting.
Outgoing Calls
In the Outgoing Calls options, you can modify the following features:
Block My Caller ID
Block My Caller ID blocks your phone number when calling other parties or contacts. The Block My Caller ID feature only blocks the Caller ID to external parties. People within your company directory can still see your Caller ID. To enable, expand Outgoing Calls, and select the toggle next to Block My Caller ID.
Automatic Callback
Automatic Callback allows you to monitor a busy caller in your group and automatically establish a call to that person when they are no longer busy. For example, if you have been trying to reach someone in your office, but they’ve been on the phone all day, you can either continue to try and call or you can activate Automatic Callback. Once you’ve activated the feature, simply call the party you are trying to reach. If you hear a busy signal, hang up. When the person you are trying to reach is available, your phone automatically rings with a distinctive sound. This notifies you when they are available. The moment they hang up, your call is established. To enable, expand Outgoing Calls and select the toggle next to Automatic Callback.